- Task
- Version · 1.0
- Get started
Configure the Liquibase AI Changelog Generator in VS Code
Last updated: August 11, 2026
Both Liquibase XML changesets and formatted SQL come with their own complexity: XML requires precise syntax and schema expertise, while formatted SQL demands learning specific rules and conventions. The Liquibase AI Changelog Generator solves this by letting you describe database changes in natural language and automatically converting them into valid, tested Liquibase XML or SQL. This Model Context Protocol (MCP) server runs locally and integrates seamlessly with Claude Desktop, turning conversational requests like "add an email column to the users table" into production-ready changesets.
Powered by Liquibase's native Java APIs, the server offers nineteen specialized tools that handle everything from basic table operations to complex procedures and sequences. Each generated changeset is automatically validated against an H2 database to catch errors before they reach your production environment, with configurable validation and rollback options to match your workflow. As a standalone executable with 322 comprehensive tests, you can generate validated changesets immediately with no external Liquibase CLI installation required.
Before you begin
Ensure Liquibase Secure is installed.
Download the AI Changelog Generator JAR file and note its full path.
VS Code 1.102 or later must be installed.
Java 17 or higher is installed and available in the PATH.
An AI agent that can interact with an AI Changelog Generator, such as GitHub CoPilot or Claude Code must be installed.
Procedure
Open VS Code and ensure that CoPilot is enabled.
Open the Command Palette.
Use one of these commands depending on your OS:
Windows/Linux:
Ctrl+Shift+PMac:
Cmd+Shift+P
Add the AI Changelog Generator using the Command Palette.
Type in: MCP: Add Server
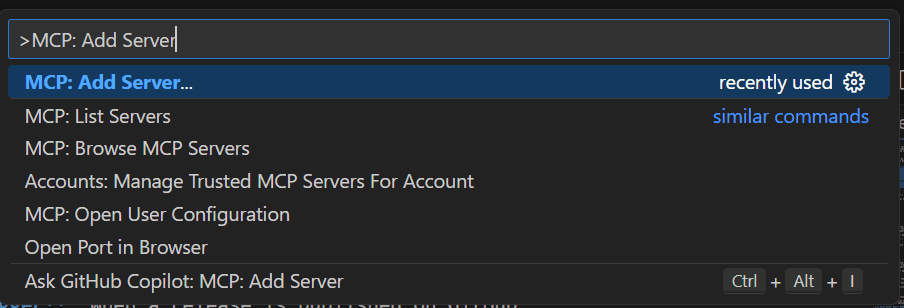
Specify STDIO as the server type by typing STDIO and press Enter.
STDIO stands for Standard Input/Output. This is the most common and reliable server transport method.
Enter one of the commands below in the command palette to run the server.
Local JAR command:
Enter:
java -jar /full/path/to/liquibase-mcp-changelog-server-1.0.0.jar
to run the server.
Note: Ensure you replace /full/path/to/ your local path to the jar file downloaded earlier.
OR
Docker image command:
Enter:
docker run liquibase/liquibase-mcp-changelog-server:latest
to run the server.
Note: Ensure you have obtained the Liquibase AI Changelog Generator Docker image before using this option.
Give the server a unique name that indicates it's for Liquibase changelogs.

In this example, we use liquibase-changelog-mcp-server.
Choose your configuration scope.
Select Global to use the AI Changelog Generator across all projects.
Select Workspace to use the AI Changelog Generator only in the current project.
Optional: Configure Formatted SQL output and database targeting
By default, the AI Changelog Generator generates XML output, which is database-agnostic and works with all Liquibase features. If your team prefers SQL-first workflows, you can switch to Formatted SQL output and specify your target database dialect.
1. Open your settings.json by opening the Command Palette and typing Preferences: Open Workspace Settings (JSON).
2. Add environment variables to the server entry as shown below.
The following example configures the server to generate Formatted SQL output targeting a PostgreSQL database:
Configure your Liquibase Secure license key
The Liquibase AI Changelog Generator requires a Liquibase Secure license key. You must configure this within the mcp.json file or as an environment variable.
1. Open your mcp.json file by opening the Command Palette and typing Preferences: Open User Settings (JSON).
2. Add your LIQUIBASE_LICENSE_KEY environment variable to the server entry as shown below.
Ensure that you have replaced your-license-key-here with your actual key.
Add your Liquibase Secure License key to the mcp.json file:
Verify the server is installed successfully.
Once complete, the mcp.json file will open to display your server data. Ensure that the server displayed says it is running.
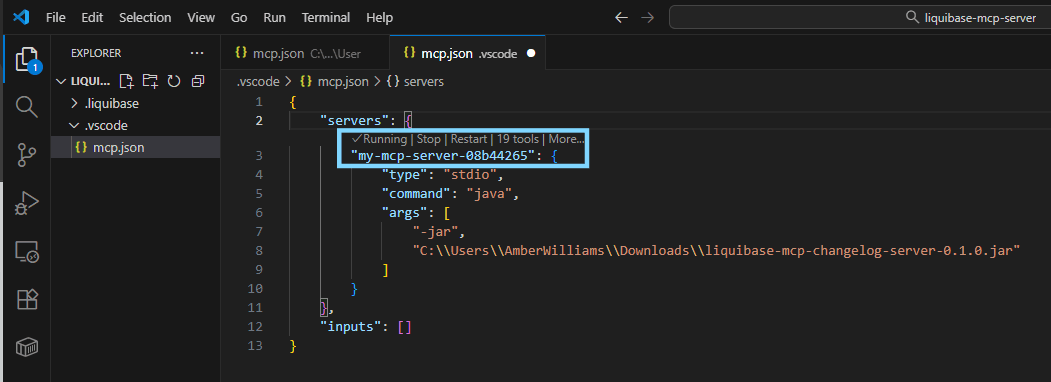
OR:
Open the Command Palette and type in MCP: List Servers
Confirm that the liquibase-changelog-mcp-server appears and says Running in the list.
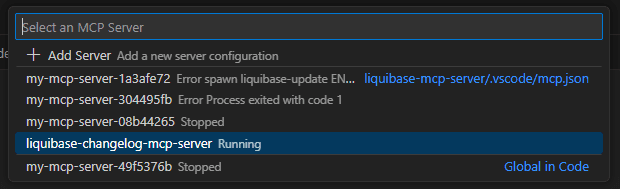
Confirm that your server starts and is running successfully
The Liquibase AI Changelog Generator checks for your Secure license key when you start it. Within VS Code, check the server output to ensure:
1. The License check line says VALID
2. The c.l.m.c.LiquibaseChangelogMcpServer line states that the License validation is successful.
The line will look similar to the one below.
2026-05-28 03:46:50.855 [warning] [server stderr] 03:46:50.852 [main] INFO  c.l.m.c.LiquibaseChangelogMcpServer - Validating Liquibase Secure license...
2026-05-28 03:46:54.188 [warning] [server stderr] 03:46:54.186 [main] INFO  c.l.m.c.utils.LicenseValidator
- License check: VALID - Liquibase Secure license confirmed via CLI
2026-05-28 03:46:54.189 [warning] [server stderr] 03:46:54.186 [main] INFO c.l.m.c.LiquibaseChangelogMcpServer - ✓ License validation successful
2026-05-28 03:46:54.189 [warning] [server stderr] 03:46:54.186 [main] INFO c.l.m.c.LiquibaseChangelogMcpServer -