- Task
- Run Liquibase against the H2 sandbox
Run Liquibase against the H2 sandbox
Last updated: September 29, 2026
Before you begin
This tutorial is intended for developers setting up Liquibase for the first time. It walks you through installing Liquibase and exploring its basic functionality using the built-in sandbox. The sandbox includes a packaged H2 database and pre-made changelog files so you can practice running Liquibase commands immediately.
Already have Liquibase installed? Skip this walkthrough and make your first governed database change.
Setting the server up for your team? Start with what Liquibase Secure server is.
Your company already runs the server and you only want the web app? Log in to Liquibase Secure server.
In this tutorial, you'll do the following:
Install Liquibase on Windows, macOS, or Linux. Check out our full installation guide for additional ways to install, including NPM, Maven, and others.
Set up a Liquibase project by removing the sample files from the installation and creating a clean project with the essentials, including a
liquibase.propertiesfile, a changelog, and an H2 database.Add a Changeset to the Changelog. This is the core task you’ll perform to manage and control secure changes to your database once you've implemented Liquibase.
Open the report Liquibase writes at the end of the run, which is the record of what was deployed.
Before you begin
Java installed on your host machine. Liquibase is a Java-based application that runs on minimal hardware.
Procedure
Download the Liquibase installer
Our downloads pages include installers for Windows, Mac, Linux, and Unix:
Liquibase Secure — download the installer
Liquibase Community — download the installer
Select download to run the installer.
If the Liquibase Installer does not start automatically after downloading, locate the Installer file in your Downloads directory and run it.
Note: If Windows security prevents the Liquibase Installer from running, click Run Anyway. Depending on your version of Windows, you might need to click More info first.
Note: If you downloaded a .zip or .tar.gz archive instead of an installer, extract the contents to a local directory.
Add Liquibase to your system PATH.
To run Liquibase commands from any terminal window, you must add the Liquibase/bindirectory to your systemPATH. For detailed instructions, refer to the documentation for your operating system.
Windows - Follow the official Microsoft documentation. Do not delete any existing values in the PATH. Just add your Liquibase path to the end, separated by a semicolon.
macOS, Unix, and Linux - Use the Linux guide to add a directory to PATH to your system path. If you're using if you're using Zsh (default on macOS 10.15+), you'll add the export path to your
~/.zshrcfile. If you're using Bash (common on Linux and other Unix systems), you'll add the export path to your~/.bashrcor~/.bash_profilefile. Example line to add:export PATH="$PATH:/usr/local/liquibase/bin"
Be sure to use the full path to the /bin directory inside the folder where you extracted. For example: /usr/local/liquibase/bin when you add Liquibase to your system path.
Verify Liquibase has been added to your system PATH
Once added, open a new Command Prompt and run:
liquibase --versionIf it returns the version number, Liquibase is installed and ready to use.
Copy the Liquibase examples directory from the installation directory to another location on your machine.
Inside the folder where you installed Liquibase, you'll see a folder called examples. Copy this folder and paste it into another location.
Start the H2 database
Liquibase packages an H2 database as a sandbox that you'll use to try out Liquibase. To run the database, you'll need to open a terminal at the location where you pasted your example folder and run:
liquibase init start-h2The database console opens automatically in a browser on port 9090. The terminal includes the following output:
...
Opening Database Console in Browser...
  Dev Web URL: http://192.168.56.1:8090/frame.jsp?jsessionid=d219f3d2012e078770943ef4c2cd0d11
  Integration Web URL: http://192.168.56.1:8090/frame.jsp?jsessionid=d7ab638787c99dbfe9c8103883bee278
Run your changelog
The examples folder you copied contains four additional folders inside: json, sql, xml, and yaml.
Choose one of these languages and open a terminal inside that folder. Then run:
liquibase updateLiquibase displays the following output:
Running Changeset: example-changelog::1::your.name
Running Changeset: example-changelog::2::your.name
Running Changeset: example-changelog::3::your.name
Liquibase command 'update' was executed successfully.
When you run liquibase update, Liquibase looks at the liquibase.properties file in the examples folder to see where your changelog. If you open the liquibase.properties file, you'll see the line changeLogFile=example-changelog.
The example-changelog file in the examples folder contains a changelog with 3 changesets run during execution.
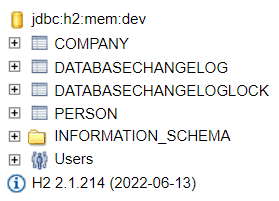
Confirm that the PERSON and COMPANY tables were added.
Now that your changeset has ran, you can refresh your h2 database to see the changes applied. You'll need to navigate back to your browser window where your database is running and refresh the page.
Using a text editor open the example-changelog file and add the following changeset to the end of the file.
Save and close example-changelog
Enter the following command
liquibase updateLiquibase displays the following output:
Running Changeset: example-changelog.yaml::4::your.name
Liquibase command 'update' was executed successfully.
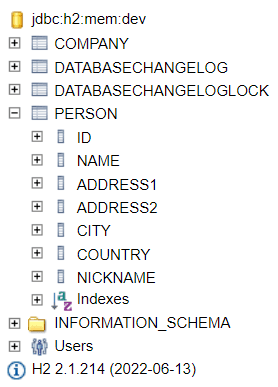
Confirm the update by refreshing the database console and verifying that the NICKNAME column has been added to the PERSON table.
Review the update report
When the update finishes, Liquibase writes a report and opens it in your browser.
The report lists the changesets the run deployed, the database it ran against, and the outcome of each one. It is the same record Liquibase Secure server keeps for a whole team once operations are reported to it, which is what your first governed database change sets up.