Get Started with Liquibase and JSON
After you install Liquibase, get started with our tutorial and learn how Liquibase works.
With Liquibase, SQL statements [1] are declared as Liquibase changesets [2] in a changelog file [3].
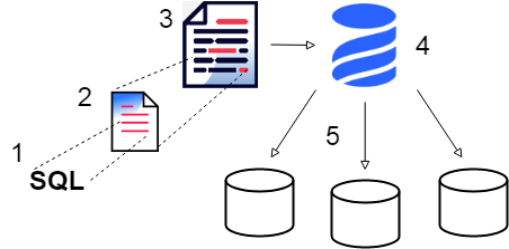
Liquibase [4] then uses the changelog to apply the changesets to target databases [5].
In this tutorial, you will use an example changelog to apply two rounds of updates to an H2 database that is included with the Liquibase installation files.
Applying updates to the database
- Copy the Liquibase
examplesdirectory from the installation directory to another location on your machine. -
From a command line terminal, enter
liquibase init start-h2to start the example H2 database. The database console opens automatically in a browser on port 9090. The terminal includes the following output:... Opening Database Console in Browser... Dev Web URL: http://192.168.56.1:8090/frame.jsp?jsessionid=d219f3d2012e078770943ef4c2cd0d11 Integration Web URL: http://192.168.56.1:8090/frame.jsp?jsessionid=d7ab638787c99dbfe9c8103883bee278
- Open a new command line terminal and enter the following commands:
cd <your path>/examples/json
liquibase update
Liquibase displays the following output:
Running Changeset: example-changelog.json ::1::your.name
Running Changeset: example-changelog.json ::2::your.name
Running Changeset: example-changelog.json ::3::your.name
Liquibase command 'update' was executed successfully.update command
Liquibase applies the following updates, which are specified as Liquibase changesets in example-changelog.:
{
  "changeSet": {
    "id": "1",
    "author": "your.name",
    "changes": [
      {
        "createTable": {
          "tableName": "person",
          "columns": [
            {
              "column": {
                "name": "id",
                "type": "int",
                "autoIncrement": true,
                "constraints": {
	              "primaryKey": true,
		          "nullable": false
	            },
	          }
            },
            {
	          "column": {
                "name": "name",
	            "type": "varchar(50)"
              }
            },
	        {
	          "column": {
	            "name": "addresss1",
                "type": "varchar(50)"
	          }
	        },
	        {
	          "column": {
                "name": "addresss2",
	            "type": "varchar(50)"
	          }
	        },
	        {
              "column": {
                "name": "city",
                "type": "varchar(30)"
	          }
            }
          ]
        }
      }]
    }
  },
{
  "changeSet": {
    "id": "2",
    "author": "your.name",
    "changes": [
      {
        "createTable": {
	      "tableName": "company",
	      "columns": [
	        {
	          "column": {
                "name": "id",
                "type": "int",
                "autoIncrement": true,
                "constraints": {
                  "primaryKey": true,
                  "nullable": false
		        },
	          }
	        },
	        {
	          "column": {
	            "name": "name",
	            "type": "varchar(50)"
              }
	        },
            {
	          "column": {
                "name": "addresss1",
	            "type": "varchar(50)"
	          }
	        },
	        {
	          "column": {
                "name": "addresss2",
		        "type": "varchar(50)"
	          }
	        },
            {
	          "column": {
                "name": "city",
                "type": "varchar(30)"
	          }
	        }
	      ]
        }
      }]
    }
  },
  {
    "changeSet": {
      "id": "3",
      "author": "your.name",
      "changes": [
        {
          "addColumn": {
            "tableName": "company",
            "columns": [
              {
                "column": {
                  "name": "country",
                  "type": "varchar(2)"
                }
              }
            ]
          }
        }]
      }
   }
The author-id value pairs your.name:1 and your.name:2 prevent their respective changesets from accidentally being run multiple times as new changesets are added to the changelog for subsequent updates. For more information, see Changelog.
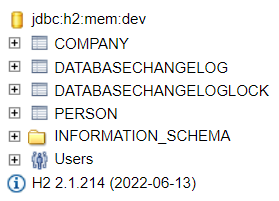
- From the database console, confirm that the
PERSONandCOMPANYtables were added successfully. You may have to click the "Refresh" button to see the changes.
-
Using a text editor, open
<your path>/examples/json/example-changelog.json, add a comma after the last changeset closing braces}, and then add the following changeset to the end of the file before]}:{ "changeSet": { "id": "4", "author": "your.name", "changes": [ { "addColumn": { "tableName": "person", "columns": [ { "column": { "name": "nickname", "type": "varchar(30)" } } ] } }] } } - Save and close
example-changelog.. -
Enter the following command:
liquibase updateLiquibase displays the following output:
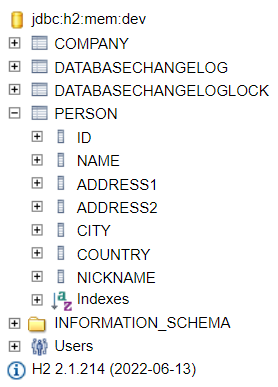
Running Changeset: example-changelog. - Confirm the update by refreshing the database console and verifying that the
NICKNAMEcolumn has been added to thePERSONtable.
Next steps
- Introduction to Liquibase – Dive into Liquibase concepts
- Design Your Liquibase Project – Create a new Liquibase project folder and organize your changelogs
- Liquibase Database Tutorials – Configure Liquibase to work with your own database
- How to Apply Your Liquibase Pro License Key – If you use Liquibase Pro, activate your license
