- Task
- Version · 5.0
- User guide
Enable Liquibase License Tracking
Last updated: August 7, 2026
Liquibase License Tracking is currently in Public Preview. Features and capabilities may change based on customer feedback. For assistance or updates, contact Liquibase Support. Liquibase License Tracking - Public preview (LLT) allows Liquibase Secure 5.0 users to monitor and report on their license utilization locally across teams, environments, and CI/CD pipelines. This feature provides visibility into active vs expired licenses, compliance risks, operational inefficiencies, and historical insights. Once enabled, this functionality allows you to produce an easy-to-analyze License Tracking report that contains:
The number of licenses tracked
Active licenses
Active licenses nearing expiry
Expired licenses
Total number of licenses
Total number of unique targets for active licenses
License inventory and utilization
A breakdown of the active license usage per tracking ID
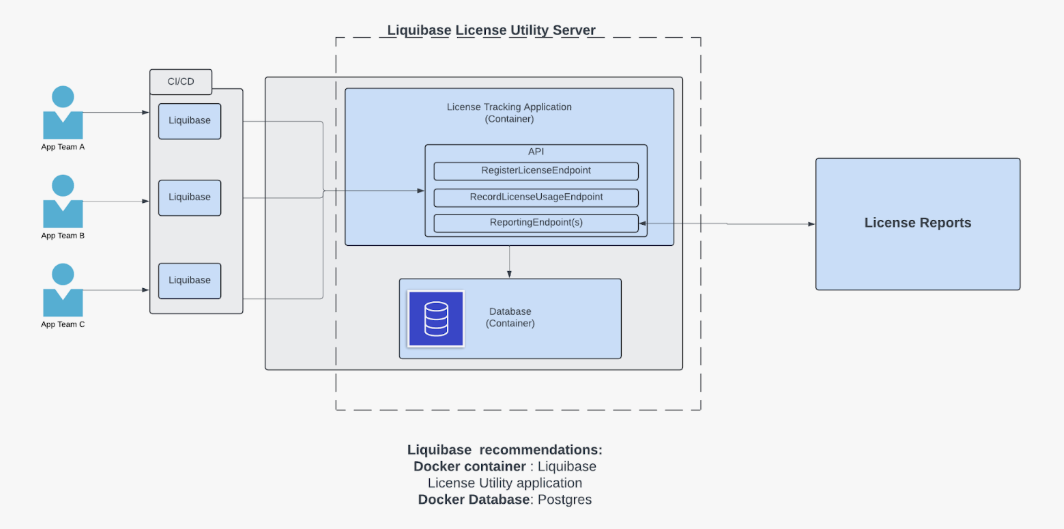
Before you begin
A DNS hostname must be configured for the LLT Server before proceeding. The hostname must resolve correctly from all client machines that will use Liquibase.
Port: LLT listens on port 8080 by default, and this guide uses 8080 in its examples. You can run LLT on any port you prefer. If you choose a different port, use it consistently in the steps below and set your license tracking URL to match. Whichever port you choose must be open and accessible from all client machines. Work with your infrastructure team to:
Create a DNS record that points
liquibase-tracking.localto your LLT Server's IP address.Verify the hostname resolves from client machines
Ensure firewall rules allow traffic on the port LLT runs on (8080 by default)
Procedure
To use Liquibase License Tracking, simply enable it within your existing Liquibase Secure installation.
The Liquibase License Tracking distributable is located in the dist folder inside your Liquibase installation.
Configure your LLT port
LLT runs on port 8080 by default. This step is only needed if you want LLT to listen on a different port. If so, substitute your port for 8080 in the examples below.
Set the SERVER_PORT Environment variable on your LLT host server.
export SERVER_PORT=8080set SERVER_PORT=8080$env:SERVER_PORT=8080Add -e SERVER_PORT=8080 to your docker run command
Extract and start the server.
1. Navigate to the dist folder inside your Liquibase installation.
cd liquibase-secure-5.0.2/dist
2. Unzip the license tracking package.
tar -xzf liquibase-license-tracking-1.0.0-beta.tar.gz
3. Navigate to the extracted directory and start the server.
cd liquibase-license-tracking-1.0.0-beta
$ ./start.sh
The server will start and run by default on port 8080. You should see output indicating the server is running at http://localhost:8080/. Leave this terminal window open so the server can run.
Example output
Tomcat started on port 8080 (http) with context path '/'
Started LiquibaseLicenseTracking in [X] seconds...
Configure your liquibase project.
1. Navigate to your Liquibase project directory. This will be the directory where your liquibase.properties file and changelog are located. This should be separate from your installation directory.
2. Enable license tracking in your liquibase.properties file.
Be sure to:
Replace
localhost:8080with your license tracking server URL.Replace
your-unique-idwith a unique identifier for this Liquibase instance. This could be an environment name, user name, or team name.
These are global parameters and must be placed before the liquibase command.
Test License Tracking
1. Run a Liquibase command to test that license tracking is working.
2. Verify license tracking is working by checking the LLT server terminal. Liquibase sends tracking data in the background with no additional output in your Liquibase terminal. In the LLT server terminal, you will see incoming HTTP request activity confirming that tracking data was received.
Example output
Next step
Once you have successfully enabled license tracking, you can generate comprehensive reports on your license usage.