Changelog examples
Last updated: September 2, 2025
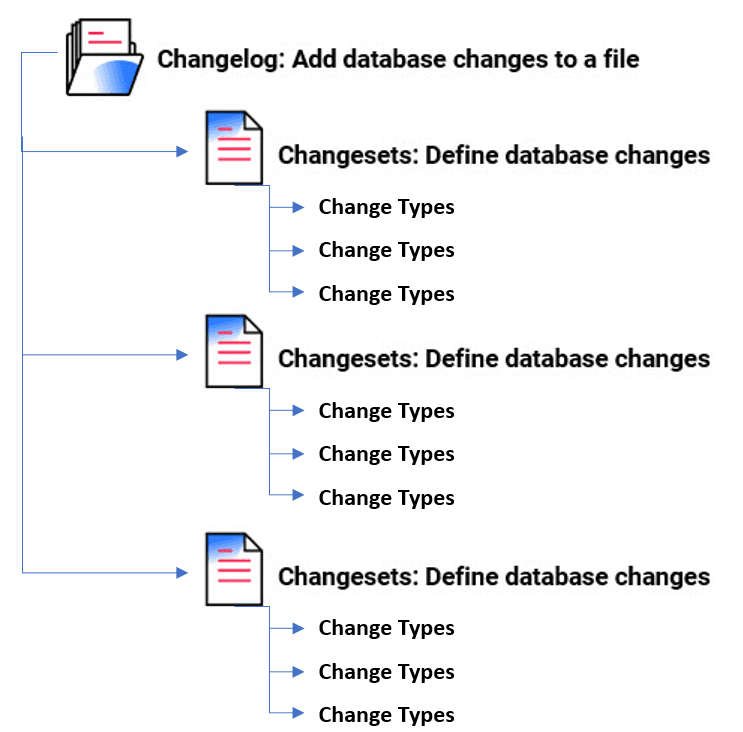
With Liquibase, you use a text-based changelog file to sequentially list all changes made to your database. This ledger helps Liquibase audit your database and execute any changes that are not yet applied. You can store and version your changelog in any source control tool.
An individual unit of change in your changelog is called a Changeset. When you want to modify your database, simply add a new changeset and specify its operation as a Change Type. For example, you may add a changeset to create a new table, and another changeset to drop a primary key.
You can also include other changelogs in a main changelog, minimizing conflicts between different teams or workflows. You can also specify preconditions, contexts, labels, and other attributes in your changelog to precisely control which changesets run—and in which environments.
When you run the update command, Liquibase deploys the changes you specify in your changelog to your database. You can specify which changelog you want to use with the --changelog-file argument in your command line (CLI), your liquibase.properties file, as an environment variable, or using the JAVA_OPTS Environment Variable.
To learn more about using changelogs and changesets, see Introduction to Liquibase. If you understand the basics of Liquibase and want to learn how to structure your changelogs, see Design Your Liquibase Project.
Changelog diagram
File formats
Your changelogs can be written in the SQL, XML, YAML, JSON formats. For Liquibase Pro users, Formatted Mongo format is also supported. Liquibase determines the changelog format by the file extension and the changelog header. If you are using the include or includeAll tags in your root changelog to reference other changelogs, your root changelog must be an XML, YAML, JSON, or Formatted Mongo file. Click the drop-downs to see examples.
Liquibase uses two models for changelogs:
The SQL model (
.sqlfiles): Write SQL statements directly in changesets in your changelog, formatted with SQL comments.The platform-agnostic model (
.xml,.yaml, and.jsonfiles): Use Liquibase Change Types corresponding to SQL changes in each changeset. Liquibase then generates database-specific SQL for you. You can also insert raw SQL statements in your changesets using the sql Change Type or reference a SQL file with the sqlFile Change Type.
Note: You can use one or more different changelog formats with Liquibase simultaneously!
Here are some qualities to consider when choosing a changelog format for Liquibase:
Familiarity: If you already know the syntax for one of the formats, you can easily use it with Liquibase.
Tools: If your existing tools and processes are built around a particular format, such as SQL, you can easily integrate changelogs of that format.
Appearance: XML syntax is specific but verbose. If you want a less verbose format, try SQL, YAML, or JSON.
Specificity: Formatted SQL changelogs let you control exactly what SQL to run. In contrast, XML, YAML, and JSON also support raw SQL statements, but are primarily meant to describe what kind of change you want to make: Liquibase handles the underlying database logic for you. XML, YAML, and JSON changelogs can be useful if you're working with multiple databases and don't want to write database-specific SQL, or if you want Liquibase to generate automatic rollback statements for some changes.
The following examples demonstrate the structure of a changelog using generic terms. For examples that use real change types and preconditions, see the "Example Changelogs" pages linked in the drop-down tabs.
Changelog examples
--liquibase formatted sql

--precondition-name precondition-attribute:value

--changeset author:id
changetype name (
    changetype attributes
);
--rollback <SQL statement>
--rollbackSqlFile path:<filepath>
Runtime logic
When you run a database update, the Liquibase migrator detects the changelog file type from the file extension and then parses the changelog header. Liquibase checks any global preconditions specified. If any of the global preconditions fail, Liquibase exits with an error message explaining what failed. Preconditions can be typically used for both documenting and enforcing expectations or assumptions. For example, you can specify the DBMS to be run against the changelog or the user you should log in to run changes.
If all preconditions are met, Liquibase will begin running changeset and include tags in the order they appear in the changelog file. You can control which changesets run in a particular migration using contexts, labels, and other attributes on the changeset level. Liquibase uses the DATABASECHANGELOG table to keep track of which changes it has already deployed. In Liquibase 4.27.0 and later, Liquibase also records additional migration information in the DATABASECHANGELOGHISTORY table.
Each changeset contains the id and author tags. The id tag, author tag, search path location, and name of the changelog file create a unique identifier for the changeset.
Note: View the XML schema for the changelog tag. The version of the XSD can be set to either latest to match your current version of Liquibase, or latest can be replaced with a specific version, like http://www.liquibase.org/xml/ns/dbchangelog/dbchangelog-4.25.xsd. Legacy XSDs are listed on the XML Format page.
Attributes
You can apply these attributes to your whole changelog:
Attribute | Description |
Specifies the changeset contexts to match. Contexts are tags you can add to changesets to control which changesets are executed in any particular migration run. Contexts you specify in the changelog header are inherited by individual changesets. See also: | |
Overrides the file name and path when creating the unique identifier of changesets. It is required when you want to move or rename changelogs. | |
Controls how object names are quoted in the SQL files generated by Liquibase and used in calls to the database. Default:
Not supported with Formatted Mongo. |
Nested elements
You can use these tags in the body of your changelog or sometimes within another nested element:
Tag | Description |
Preconditions required to execute the changelog. If global, must be passed before the changeset is run. Preconditions are typically used for doing a data sanity check before doing something unrecoverable such as a Not supported with Formatted Mongo. | |
The value for which to set the property. | |
The changesets to execute. | |
Additional files containing changesets to execute. | |
An additional directory containing files with changesets to execute. | |
Include additional files using an application's native executor. Not supported with Formatted Mongo. |
Note: The tables above only list attributes and elements at the top level of a changelog. You can apply contexts, labels, and other Changelog Attributes on individual changesets. For more information, see Changesets.