Using Oracle Wallet with Liquibase
Last updated: July 13, 2026
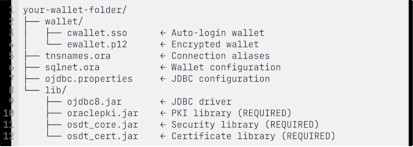
Oracle Wallet is a secure credential store that allows Liquibase to connect to Oracle Database without embedding usernames or passwords in configuration files. The Oracle JDBC Thin driver automatically resolves credentials from the wallet using a TNS alias. Your folder structure will look like this:
Before you begin
Install Liquibase
Ensure Java is installed. If you used the Liquibase Installer, Java is included automatically.
Install Oracle Client Tools (included with Oracle Database, Oracle Instant Client, or Oracle Database Client) to obtain the
mkstoreandorapkiutilities used in this procedure.Obtain connection details from your Oracle DBA: hostname, port, service name, username, and password.
Procedure
Download Oracle JDBC drivers
You need 4 JAR files to enable Oracle Wallet support. Choose your preferred method:
Go to the Oracle JDBC Downloads page.
Download the appropriate JDBC driver for your Oracle version.
Extract and copy these files to your Liquibase
lib/directory:ojdbc8.jar(orojdbc11.jarfor Oracle 21c+)oraclepki.jarosdt_core.jarosdt_cert.jar
Create your wallet folder structure
Create the directory structure for your wallet and JAR files.
Create Oracle Wallet
Set the following environment variables.
Be sure to:
Replace
your_oracle_homewith the path to your Oracle Client installation. For example,/opt/oracle/product/21c/dbhomeXE,/usr/lib/oracle/19c/client64,/opt/instantclient_21_1
Create the wallet. When prompted, enter and confirm a wallet password.
mkstore -wrl $WALLET_DIR -createAdd your database credentials to the wallet, where your_tns_alias matches the TNS alias you will define in tnsnames.ora.
Be sure to:
Replace
your_tns_aliaswith your TNS alias. This must match the alias you define intnsnames.ora. For example,MY_DB,PROD_DB,DEV_DBReplace
your_usernamewith your database username. For example,myuser,system,adminReplace
your_passwordwith your database password.
mkstore -wrl $WALLET_DIR -createCredential your_tns_alias your_username your_passwordVerify the credential was stored.
mkstore -wrl $WALLET_DIR -listCredentialCreate tnsnames.ora
Create tnsnames.ora in your wallet directory.
Be sure to:
Replace
your_tns_aliaswith your TNS alias. This must match the alias used in the mkstore command. For example,MY_DB,PROD_DB,DEV_DBReplace
your_hostnamewith your hostname. For example,localhost,mydb.example.com,192.168.1.100Replace
your_portwith your port. Usually. For example,1521Replace
your_service_namewith your service name. For example,XEPDB1,ORCL,PROD
Create sqlnet.ora
Create sqlnet.ora in your wallet directory to point the JDBC driver to your wallet.
Be sure to:
Replace
your_wallet_dirwith your absolute path to your wallet directory. For example,/home/user/oracle-wallet/wallet,/Users/name/oracle-wallet/wallet
Configure JDBC properties
Create ojdbc.properties in your wallet directory.
Be sure to:
Replace
your_wallet_dirwith your absolute path to your wallet directory. For example,/home/user/oracle-wallet/wallet,/Users/name/oracle-wallet/wallet
oracle.net.wallet_location=(SOURCE=(METHOD=FILE)(METHOD_DATA=(DIRECTORY=your_wallet_dir)))Configure Liquibase
Create or update liquibase.properties in your project directory. The URL uses /@your_tns_alias. You don't need a username or password,
Be sure to:
Replace
your_tns_aliaswith your TNS alias fromtnsnames.ora. For example,MY_DB,PROD_DB,DEV_DBReplace
your_lib_path/in the classpath with the absolute path to your JAR files. You must include all 4 JAR files for wallet support. For example,/home/user/oracle-wallet/lib/,/Users/name/oracle-wallet/lib/
Set environment variables
Set the following environment variables before running Liquibase.
To make these permanent, add them to your shell profile.
Test your setup
Verify that all required files are in place.
Test the connection with Liquibase. Be sure to navigate to your Liquibase project.
liquibase validateIf validation passes, check the changelog status:
liquibase statusA successful connection returns the number of pending changesets (or confirms the changelog is up to date).