- Task
- Version · 6.0
- Create
Install Liquibase and apply your license key
Last updated: September 29, 2026
Liquibase is a Java-based application that runs on minimal hardware. Java must be installed on the machine you are installing it on. See System requirements for the supported Java versions, operating systems, and database platforms.
Installing is the first thing you do whichever direction you are heading. If you are only trying Liquibase out, Run Liquibase against the H2 sandbox covers a laptop install and a first run together, in one sitting. This page is the fuller version, and the one to follow when you are installing onto the build agent identified in your infrastructure checklist.
Before you begin
This procedure covers four things, in order: installing Liquibase, applying the Liquibase Secure license key, installing any drivers your database needs, and validating that both the install and the key are working.
Procedure
Install Liquibase
Liquibase works on Windows, Linux, and macOS.
The simplest route is to download the liquibase-<version>.zip archive from the Liquibase download page and extract it to a local directory. For example:
On Linux, extract into
/opt/liquibase/liquibase-<version>On Windows, extract into
C:\liquibase\liquibase-<version>On macOS, extract into
~/liquibase/liquibase-<version>
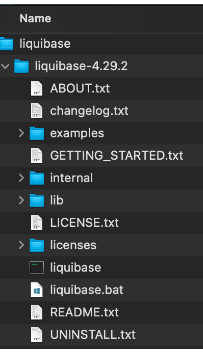
Then create a symbolic link pointing at the version you want to run, and point PATH at the link rather than at the versioned directory. Restart the shell session so the change takes effect.
The symbolic link is the step people skip, and it is the one that pays off later. Because the link is what PATH resolves, whoever maintains the pipeline can move it to a new version without touching the agent's environment, and can move it back if a release misbehaves. Call Liquibase by its versioned path instead and every upgrade becomes a change to the agent configuration.
Liquibase is also available as a Docker image on Docker Hub. No installation is needed: pull the image with docker pull liquibase and run it with one of the docker run commands given on Docker Hub. If you are using the Docker image, skip to step 2.
Step-by-step guides for your platform
The above is the general shape. Each of these covers one route end to end, with the exact commands:
Apply the Liquibase Secure license key
Add the license key to your liquibase.properties file.
liquibase.licenseKey: YourKeyHereIf you are running the Docker image, pass the key as an environment variable instead.
If you do not have a key yet, request a 30-day Liquibase Secure trial key from liquibase.com.
On a build agent, the key belongs in the credential manager alongside the database credentials, not in a committed properties file. See Secure your database connections.
Install drivers
The Liquibase installation already includes JDBC drivers for the popular database platforms, including Oracle, SQL Server, PostgreSQL, MariaDB, Snowflake, and H2.
If you are working with a different supported database, find yours in Connect databases and tools. Each platform page lists the driver it needs and where to get it.
Validate the install and the license key
Run liquibase --version. The output confirms that Liquibase can read the Secure key, and lists the drivers available for your database types.
For the Docker image:
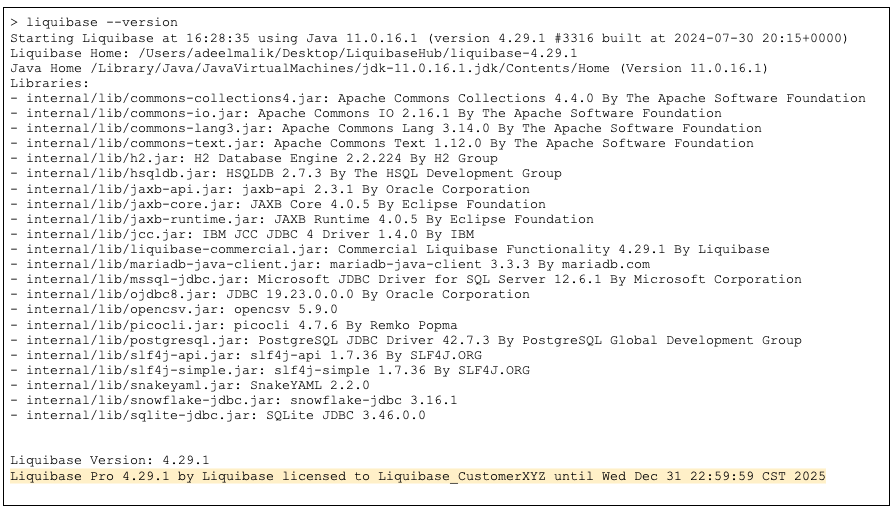
liquibase --version reporting the Secure edition and your drivers means the agent is ready.
The next decision is how to lay out your changelog, which shapes everything after it. How should I structure my changelog? compares organizing by object, organizing by release, and generating the structure from an existing database.