- Concept
- Version · 6.0
- Deliver
Set up Azure DevOps pipelines
Last updated: September 29, 2026
This page explains how to set up an Azure DevOps pipeline that uses a self-hosted agent to execute Liquibase operations through Liquibase flow files.
An Azure DevOps self-hosted agent can be shared among multiple projects, so one agent can serve several teams.
Using Azure DevOps with Liquibase
An overview of the pipeline this page builds.
Prerequisites
An integration with Azure DevOps requires the following:
An Azure DevOps project in your organization, and membership in the Project Administrators group or the Build Administrators group
Liquibase Secure installed on a self-hosted Azure DevOps agent. The network must be configured from this agent to allow connections to the databases you wish to manage
This sample uses a GitHub repository, but you can use an Azure Repo if you prefer.
Complete Set up the automation prerequisites first: the repository, the branches, and the three databases are shared with the GitHub Actions example.
For more on Azure Pipelines and its agents, see the Azure Pipelines documentation.
1. Create the Azure pipelines
Four pipelines must each be created and given permissions individually: The architecture these pipelines implement is described in Design your deployment pipeline, and the flow files they invoke do the actual Liquibase work.
Pipeline | Definition |
|---|---|
Continuous Integration |
|
Continuous Deployment |
|
Manual Deployment |
|
Rollback Utility |
|
Create a new pipeline for each definition:
Go to the Azure DevOps project and select Pipelines > Pipelines.
Select New pipeline.
In the Where is your code panel, select GitHub.
In the Select a repository panel, select the GitHub repository from the prerequisites. To see it, you might need to change the My repositories dropdown to All repositories.
In the Configure your pipeline panel, select Existing Azure Pipelines YAML file.
In the Select an existing YAML file panel, select the
developbranch, then the pipeline definition, then Continue.In the Review your pipeline YAML panel, open the dropdown under Run and select Save. The pipeline is created.
Saving rather than running is deliberate. Running it here would execute against a database before the secrets exist.
2. Set up environments and secrets
Set up your variable groups using Secure setup using Azure Key Vault.
The example uses DEV, QA, and PROD environments.
3. Execute the development pipeline
Commit a change to the changelog in the
developbranch of your repository.Go to Azure Pipelines and observe the Continuous Integration pipeline.
Grant the permissions the pipelines need in order to run for the first time. Select View when you see the message, then select Permit:
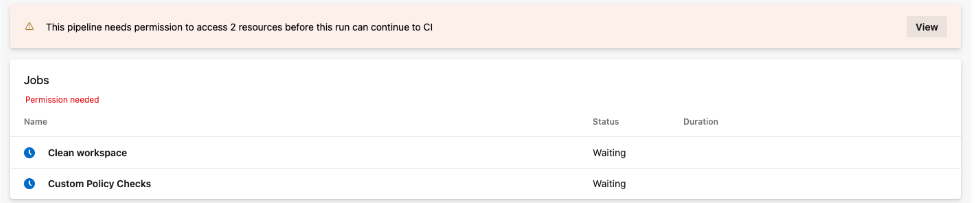
Repeat for each permission prompt. A pipeline that touches a repository, a variable group, and an agent pool asks once per resource, so expect several.
This first-run permission step is the one that most often looks like a broken pipeline. The run does not fail, it waits, and nothing happens until somebody opens it and permits each resource.